CASING
How do you select a size and pattern for casing?

Choosing the casing is the primary and most important molding selection. The casing is visible from almost everywhere in the home, and in the most quantity, as it frames all the doors and windows. It also determines to some degree the size of base and chair rail, as these moldings butt into the casing, requiring them to be slightly thinner and in proportion to the casing.
If you are painting, consider casing details which will provide shadow lines, such as beading, steps, channels, etc. Unless you want a very plain flat surface, outside of your paint color, the shadow lines and molding shape will be the only features that create decoration.

A painted molding, being less expensive to purchase and install, means that you can consider a larger molding that may have more visual impact. This is a consideration for all casings whether painted or not. Where a ¾” x 3 to 3 ½” molding might be a good overall casing size for 6‘8 doors and 8‘ ceilings, you might consider a 1” x 4 to 4 ½” casing on the main floor, and/or for featured openings such as a dining room or entryway, or around large doors and windows. Taller doors, say 7’0 and taller can use a scaled-up casing to stay in proportion. If two sizes of casing are used, large casing on the main floor and small casing on the second floor, for example, the patterns need to be the same, while scaling up the larger.
Another way to achieve the two sizes is to use the same casing on all openings, but in featured areas to add a second molding that overlaps the first on the outside edge. This is called a backband or lip molding, and requires a small area of flat on the outside surface of the casing face. The backband should also provide a flat surface on its outer edge that meets the wall to receive the base at doorways. That flat surface should measure at least 1/8” more than the thickness of the base. Now, given the overall size of the trim, the desired pattern can be selected.
A good rule of thumb is to look at interior photos of molding and pick a look you like. Spending too much time in the selection process is counterproductive. We find that most people who spend a lot of time deciding, often return to the first moldings they identify as attractive. While I might suggest looking for some shadow lines and pattern in a painted trim, a stained or clear-coated trim can best show off the grain with shapes that have some areas uninterrupted by sharp pattern features. This doesn’t mean you don’t want those sharp features, but that you may want some of the pattern to be just curving or flat, rather than, say, filled with flutes or beads. In this way you can combine grain, color and pattern to give it an overall impact.
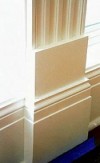
base
How do you choose the size and pattern of your base molding?
For overall size of base, we recommend maintaining a 3 to 5 ratio of casing to base. If the casing is 3 ¼”, the base should be about 5 ½”. If the casing is 4 ¼”, the base would be 7”, and so on. If the base is butting into the casing at doorways, then hold the thickness to 1/8” less than the casing. Casing of ¾” thickness, then would require a base of about 5/8” thickness. Note that most of our catalog base patterns are adjustable for thickness and width. An option to butting the casing into the base is to use a plinth block below all legs (vertical sides) of the door casing. A plinth block should be a little taller ( about ½”) than the base, about ¼” wider than the casing and at least an 1/8” thicker than either casing or base. Plinths can be plain blocks or incorporate base-like profiles at their top.
Base patterns are often flat on the bottom 75% and have pattern only at the top 25%. This lends it a look of height, and minimizes its ability to trap dust. This pattern can be a repeat of the inside of the casing pattern, but often is more effective to have a similar style, but not identical. The more simple look at the base does give it the feel of a base, i.e. something that the rest of the moldings are based on. Too much pattern in the middle of the baseboard can detract from the casing pattern and doorways. The idea is to always keep the eye moving up.
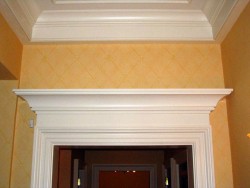
crown
Why use a crown molding?

Many homes do not have any crown, just a drywall corner.. Aesthetically, to look up at the ceiling and see nothing but ceiling is… anticlimactic.
A crown does add a decorative finish to wall and ceiling, lends a continuity to the interior spaces, and especially with patterns that have large coves, softens the sharp corners of the room.
How do you select a size for crown molding?
Again, we choose a size first. This is primarily a function of the ceiling height. Here are our suggestions for the proportion of ceiling height in feet to crown in inches (diagonally across the face of the crown):
8’- 2½ to 4”
9’- 4 to 6”
10’ -5” to 7”
12’- 7” to 9”
How do you select a pattern for crown molding?
Pattern-wise, you can pick up a theme from your casing, repeating a bead for example. Feel free to dress this area up with more detail. Crown is often either composed primarily of a french curve or cove, i.e. a concave radius with a smaller detail at the bottom or top, such as a small french curve (ogee), small cove, bead, or steps. A combination of french curve and small cove is called a colonial crown, and probably the most popular profile. These are available in several sizes. If you are looking for even more detail, consider dental blocks or a “crown bed,” like an inverted base molding on which the bottom of the crown sits. This is another way to lengthen the look of the crown.